
Keeping your casters greased and in their optimal operational condition is paramount to getting the most out of your mobility investment. In this blog post, you'll find the best method available for greasing heavy duty casters in order to get the best performance possible in high capacity material handling environments. This blog post is based off our YouTube video found here.
Step 1: Assemble the Tools for the Job
The first step in greasing your heavy duty casters is to gather all the required tools and parts. To grease, you'll need a caster greasing kit, which usually conisists of a tube of grease, a grease gun, and a greasing nozzle attachment. Often, you can find these kits at your local hardware store or online. You'll also want to have a few rags handy for any cleanup along the way, as well as a brush or second rag to remove dirt and other gunk when the time comes later in this process.
Step 2: Safety is a Requirement!
Before going any further, always remember that safety is a must when performing any maintenance activity. Be sure to wear gloves and eye protection to keep your hands and eyes protected from any grease splatter or debris. Some greases may contain ingredients that have the potential to irritate eyes and skin, or even cause burns in certain scenarios, should the come into contact with these parts of the body, so preventing this contact and any potential injury is crucial.
Step 3: Identify the Caster's Greasing Points
Next, it is important that we identify the type of casters you have by checking the wheel, rig, and bearing for greasing points, also called "zerks". Different casters may have specific greasing points, so it's important to know you which ones you are working with. If you're unsure, check the manufacturer's guidelines or manual. Typically, there will be two grease zerk locations, one in the swivel section of the caster rig (this will not be present in maintenance-free casters) and the other being in the head of the axle and/or the core of the wheel.
Step 4: Determine the Caster's Type of Wheel Bearing
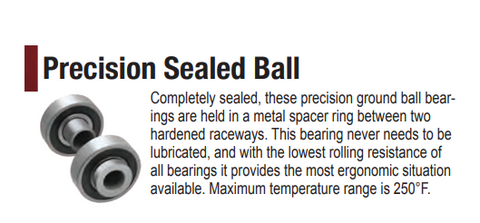
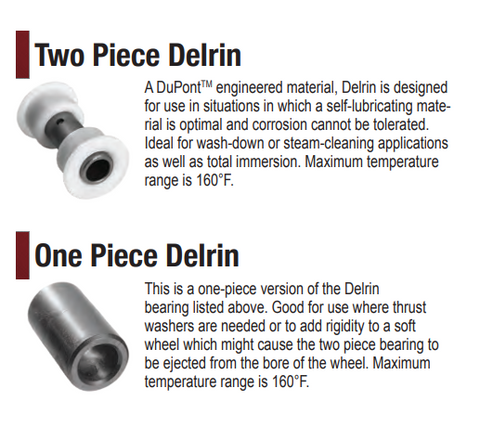
Before going any further, it is important to confirm the type of bearing your caster uses in order to ensure that the right maintenance is performed. There are a few types of commonly used bearings, with the most popular types being either a roller bearing, which requires grease, and the other two popular types are sealed ball

bearings, which do not need additional grease as they come pre-greased and sealed to keep out contaminants, and the other being a self-lubricated Delrin bearing which also does not require grease.
Roller bearings are the most popular choice, as they are economical, handle impact, and provide good industrial mobility. They require regular greasing to maintain optimal performance and you will notice them getting loud when they do not have proper grease levels. Noise is typically the most noticeable sign that a caster needs greasing.
|
 |
Step 5: Check the Manufacturer's Guidelines
In order to determine the type of bearings your casters have and whether they need greasing, it's always a good idea to check the manufacturer's guidelines or the caster's manual. This information will guide you on the specific maintenance requirements for your casters, including the frequency to which you should grease. Typically, a caster with daily usage would need to be greased two to four times per year depending on cart/equipment usage (this could be more or less frequently, depending on your individual usage). Heat, pressure, and exposure to moisture can also play a role in casters requiring more frequent lubrication and greasing requirements.
Step 6: Clean Off the Casters
In order to prepare the caster for greasing, any and all dirt or debris must be cleaned off of the caster, wheels, forks, and all. Use a brush or cloth to remove any dirt, debris, or old grease from the caster's grease zerk areas, raceways, and wheels. Be sure to double check any nooks and crannies on the wheel or the fork where contaminants may have built up over time during use. This ensures that the new grease can do its job effectively and that debris will not impact the caster's performance.
Step 7: Apply the Grease
Now, It's time to apply the grease to the caster. To begin, attach the nozzle to the grease gun and carefully insert it into the zerks on the caster. Apply a moderate amount of grease, being careful not to overapply, as too much grease could clog up the caster. When it comes to ensuring maximum mobility, over-greasing can be as bad as under-greasing and cause unwanted friction.
Step 9: Rotate the Caster
In order to ensure that the grease which you just applied is spread throughout the caster, rotate the caster at any point in which movement or swiveling occurs. Continue to do this until no noise or grinding is heard and double check that all caster motion occurs with ease. This is an important step for ensuring that the grease is evenly distributed. This helps to coat all moving parts, preventing friction and prolonging the life of your casters.
Step 10: Wipe Excess Grease
Now that you've applied the grease and spread it evenly, it's a good idea to wipe away any excess grease with a clean cloth. This step is crucial, as excess grease can attract more dirt and debris, leading to a messy and less efficient setup.
Remember, understanding the type of bearings your casters has along with its estimated usage frequency is crucial in determining the appropriate maintenance routine. Always refer to the manufacturer's guidelines to ensure you're giving your casters the care they need. Additionally, be on the lookout for more How To's, both here on the blog and by subscribing to our YouTube channel for video versions.